The M5Paper was one of my luckily few pandemic boredom impulse buying. I planned to use it as a hot key keyboard like a Stram Deck, but this never happened. I only flashed it with the calculator demo example app and multiplied 42 by 1337.
After moving in our new House, I found it in a bow with many other never finished projects when I was furnishing my man cave. I took it up and placed it on my desk for a while, hence I am still thinking this is a cool device due to its ESP32 in combination with its large E-ink display with touch, and it has got a build in magnet for easy mounting like the original Tradfri Buttons. Maybe you want to check this GitHub repo out if you want to see the other features with code example packed in this little white case.
And here I found a new purpose for this lonely M5Paper module, I could use it, to control my IKEA Tradfri Lights and combine the best of two worlds, the simple wireless tiny white Tradfri buttons and the "feature rich" smartphone APP where you can control all devices and scenes and maybe adding some more comfort features, too.
For this project I decided to abandon my Tradfri gateway and replace it with the new Dirigera gateway. The main reason is that IKEA stopped selling the Tradfri gateway, and so the Project would start using a product which reached it's EOL. The Dirigera gateway has some advantages over the Tradfri gateway, too. The Android App is a little bit more polished, Pairing devices is simpler and Light can be paired without a button. And some technical aspects makes communication with the new gateway easier, instead over UDP via COAP which is an HTTP / REST inspired and DTLS encrypted protocol the Dirigera gateway provides a simple REST API over HTTPS.
First steps
Let's sort all things out before we start coding, one of my first steps is to check whether a communication between my PC and the Gateway works.
Authenticate to the Gateway and toggle a light in python
I prefer building some example code before doing all the API communication on the ESP32 in C. So I wrote a basic python client which turn on a simple light.
Luckyly enough, there are already two client libraries for the gateway, one for TypeScript and another one for Java, and both are working! With the two example libraries, building a basic python client was very simple. The most code is the authentication part, which reveals a token in JWT format. The steps are as following, generate a 128 char long random string where the valid chars are [a-zA-Z0-9], generate an SHA 256 hash from the random string and base64 encode it. Send an HTTP GET with the encoded string as code_challenge to the gateway and remember the code from the HTPP response, wait for a button press, send the random string (not it's hash) and the code from the previous request as POST in exchange for the access_token. The token is valid for 10 years, so this procedure must be taken just once. Now the tokens must just be sent as Authorization header with each HTTP request and that's it. For turning a light on, a simple HTTP PATCH request to the devices (light bulb) route e.g. /devices/18ae23fd-ca4f-4f3d-91ce-2f7cf5f0dcfc_1 with a simple JSON and the light turns on. The IP is hard coded, but mDNS could be used for automated finding of the getaways IP address.
from random import choices
from string import ascii_uppercase, ascii_lowercase, digits
from hashlib import sha256
from base64 import urlsafe_b64encode
import requests
from urllib3.exceptions import InsecureRequestWarning
from socket import gethostname
from os import path

requests.packages.urllib3.disable_warnings(category=InsecureRequestWarning) # allow the self-signed certificate

ip = '192.168.188.55'
base_url = f'https://{ip}:8443/v1'

def generate_code_verifier(code_length=128):
    return ''.join(choices(ascii_uppercase + ascii_lowercase + digits, k=code_length))

def calculate_challenge(code_verifier):
    digest = sha256()
    digest.update(str.encode(code_verifier))

    return urlsafe_b64encode(digest.digest()).decode("utf-8").replace('=', '')

def fetch_token():
    code_verifier = generate_code_verifier()
    code_challenge = calculate_challenge(code_verifier)

    url = f'{base_url}/oauth/authorize?audience=homesmart.local&response_type=code&code_challenge={code_challenge}&code_challenge_method=S256'
    response = requests.get(url, verify=False)
    code = response.json()['code']

    input("Press the Dirigera button and then press any key…")

    url = f'{base_url}/oauth/token'
    form_data = {
        'code': code,
        'name': gethostname(),
        'grant_type': 'authorization_code',
        'code_verifier': code_verifier
    }
    response = requests.post(url, data=form_data, verify=False)
    access_token = response.json()['access_token']
    print(f'🔑: {access_token}')

    return access_token

def fetch_token_cached():
    if path.isfile('token.txt'):
        print('Found token in cache')
        with open('token.txt', 'r') as f:
            return f.read()

    print('Fetch a new token')
    access_token = fetch_token()

    with open("token.txt", "w") as f:
        f.write(access_token)

    return access_token

def main():
    access_token = fetch_token_cached()
    auth_header = {'Authorization': f'Bearer {access_token}'}

    response = requests.get(f'{base_url}/devices/18ae23fd-ca4f-4f3d-91ce-2f7cf5f0dcfc_1', headers=auth_header,
                            verify=False)
    print(response.json())

    response = requests.patch(f'{base_url}/devices/18ae23fd-ca4f-4f3d-91ce-2f7cf5f0dcfc_1', headers=auth_header,
                              json=[{'attributes': {'isOn': True}}], verify=False)
    print(response)

if __name__ == '__main__':
    main()
The client will be used later for testing /debugging the required API calls, and as blueprint for the less comforable C clode doing the same request and auth procedure.
Flashing the M5Paper with a "Hello World" applciation
First of it all, we need to set up a development environment. So ensure lets that the Arduino IDE2 is installed and add the M5Stack boards.
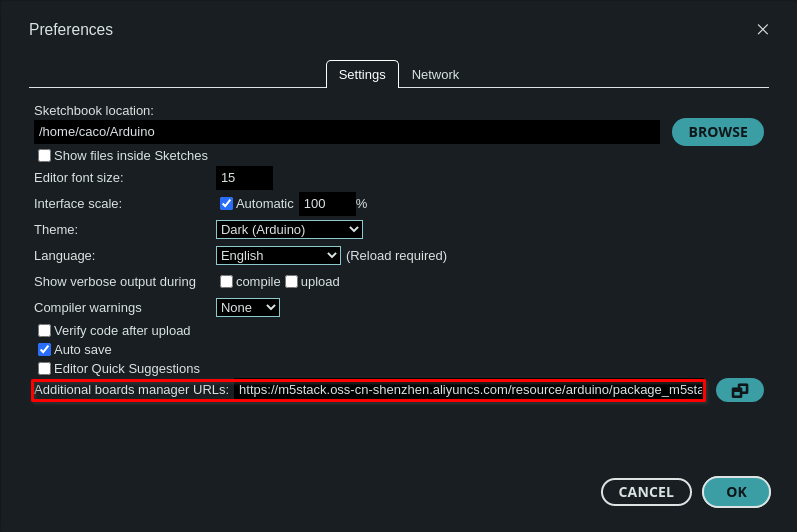
Add the board manager URL (https://m5stack.oss-cn-shenzhen.aliyuncs.com/resource/arduino/package_m5stack_index.json) from the M5Stack documentation as show here:

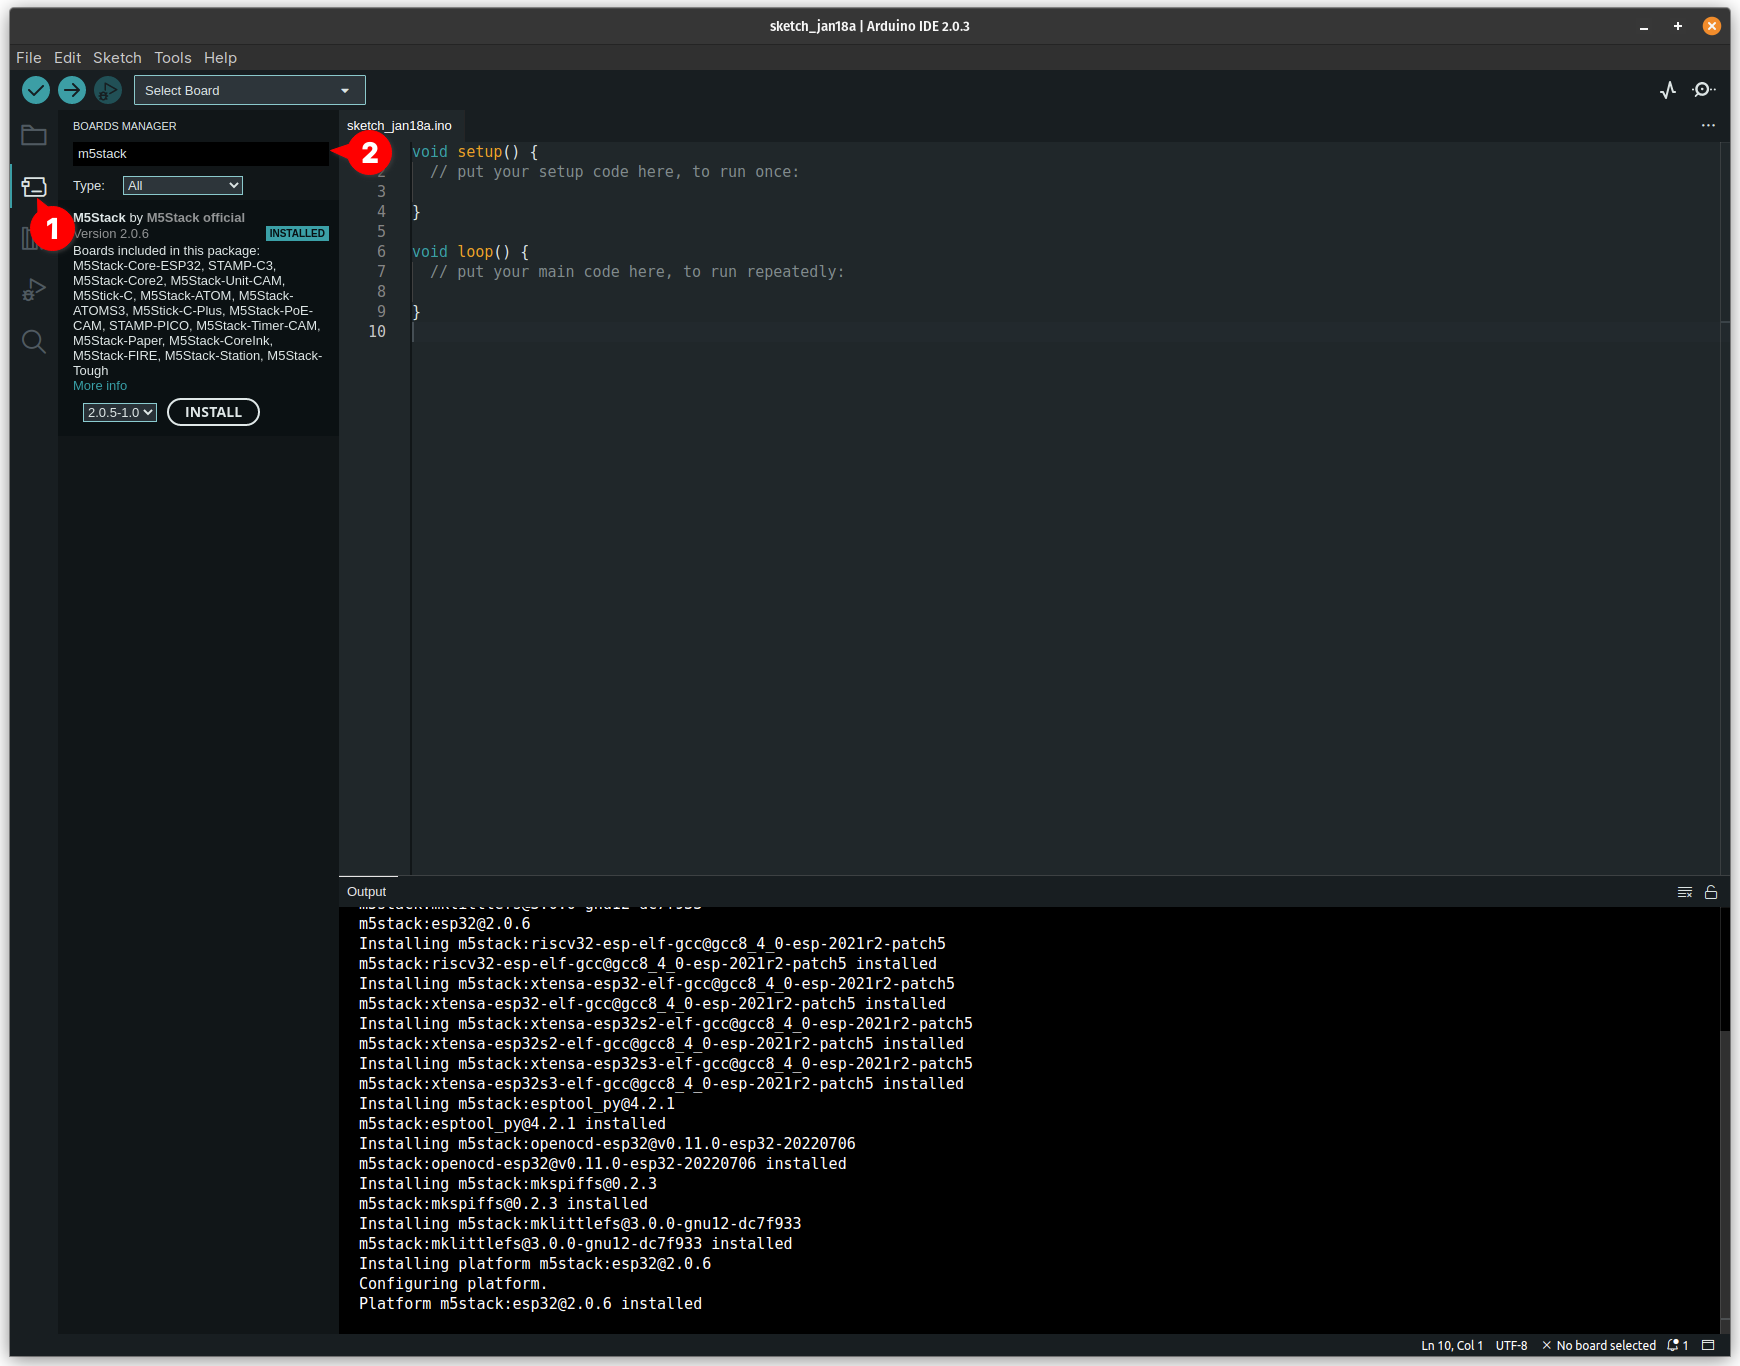
After that, the board series can be found and installed:

The M5Paper documentation refers to an older library named M5EPD, after flashing an example using the old M5EPD the M5Paper was in a reboot loop after crashing during initialization. The newer M5Unified and M5GFX working fine, I verified it by flashing the module with the M5GFX -> Basic --> TouchTest example.